Como generar un documento PDF en Android
(How create PDF document in Android)
En este tutorial vamos a generar un documento PDF en un dispositivo Android:
- Generar un documento PDF, en nuestro tutorial, crearemos una factura y la guardaremos en la sdcard.
- Leeremos este documento y lo mostraremos en la pantalla del dispositivo.
- Además enviaremos en documento PDF como adjunto por correo electrónico.
- Utilizaremos el tipo de fuente externa arialuni.ttf unicode que soporta caracteres cirílicos
Para este tutorial utilizaremos Android Studio (I/O preview) 0.3.5.
Además para generar el PDF vamos a utilizar las librerías iText Java PDF que podéis descargar desde aquí itextg-5.4.4.zip de este paquete solo utilizaremos itextg-5.4.4.jar, también la encontrarán en el proyecto que dejaré para descargar al final del tutorial.
Lo primero es crear un proyecto nuevo.
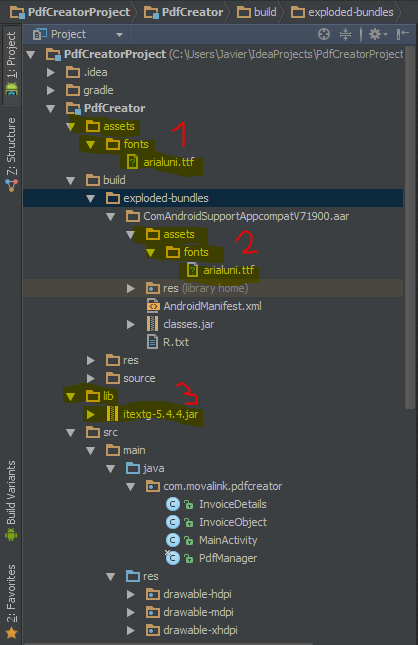
Después de haber generado el proyecto nuevo, crearemos una carpeta con el nombre de assets\fonts donde copiaremos nuestro archivo de fuentes arialuni.ttf , como muestra la imagen señalado con el número 1 en rojo. Esta carpeta íntegra la copiamos dentro de la carpeta build\ComAndroidSupportAppcompact... para evitar file not found en tiempo de ejecución, como se muestra en el número 2 en rojo.
También crearemos una carpeta con el nombre de lib donde copiaremos la librería nuestra itextg-5.4.4.jar, como muestra la siguiente imagen en el número 3 en rojo.
También crearemos una carpeta con el nombre de lib donde copiaremos la librería nuestra itextg-5.4.4.jar, como muestra la siguiente imagen en el número 3 en rojo.
Lo siguiente es crear las dependencias a esta librería (itextg-5.4.4.jar) en nuestro proyecto, lo haremos desde los (Open Module Settings).

Esta opción nos muestra la pantalla de configuración, lo primero es seleccionar Dependencias número 1 en rojo, después pulsamos el botón + número 2 en rojo, y buscamos en nuestro proyecto en la carpeta lib la librería itextg-5.4.4.jar

Revisaremos en nuestro proyecto el archivo build.gradle para ver si tenemos bien configuradas nuestras dependencias, debería quedarnos algo parecido a esto:

Después de haber creado y configurado nuestro proyecto, comenzaremos a trabajar con el activity_main.xml, aquí crearemos básicamente tres botones, uno para crear otro para leer y otro para enviar el documento.
Para obtener el siguiente menú:

A continuación veremos como quedaría la clase asociada MainActivity.java:
public class MainActivity extends ActionBarActivity {
    InvoiceObject invoiceObject = new InvoiceObject();
    private String INVOICES_FOLDER = "Invoices";
    private String FILENAME = "InvoiceSample.pdf";
    //Declaramos la clase PdfManager
    private PdfManager pdfManager = null;

    @Override
    protected void onCreate(Bundle savedInstanceState) {
        super.onCreate(savedInstanceState);
        setContentView(R.layout.activity_main);

        //Creamos una factura desde nuestro código solo para poder generar el documento PDF
        //con esta información
        createInvoiceObject();

        //Código generado por Android Studio
        if (savedInstanceState == null) {
            getSupportFragmentManager().beginTransaction()
                    .add(R.id.container, new PlaceholderFragment())
                    .commit();
        }

        try {
            //Instanciamos la clase PdfManager
            pdfManager = new PdfManager(MainActivity.this);

        } catch (IOException e) {
            e.printStackTrace();
        } catch (DocumentException e) {
            e.printStackTrace();
        }

        Button create_pdf = (Button)findViewById(R.id.button_create_pdf);
        Button read_pdf = (Button)findViewById(R.id.button_read_pdf);
        Button send_email_pdf = (Button)findViewById(R.id.button_email_pdf);

        create_pdf.setOnClickListener(new View.OnClickListener() {
            @Override
            public void onClick(View v) {
                //Create PDF document
                assert pdfManager != null;
                pdfManager.createPdfDocument(invoiceObject);
            }
        });

        read_pdf.setOnClickListener(new View.OnClickListener() {
            @Override
            public void onClick(View v) {
                assert pdfManager != null;
                pdfManager.showPdfFile(INVOICES_FOLDER + File.separator + FILENAME,MainActivity.this);
            }
        });

        send_email_pdf.setOnClickListener(new View.OnClickListener() {
            @Override
            public void onClick(View v) {
                String emailTo ="mailTo@gmail.com";
                String emailCC ="mailCC@yahoo.com";
                assert pdfManager != null;
                pdfManager.sendPdfByEmail(INVOICES_FOLDER + File.separator + FILENAME,emailTo,emailCC, MainActivity.this);
            }
        });
    }

    //Código generado por Android Studio
    @Override
    public boolean onCreateOptionsMenu(Menu menu) {

        // Inflate the menu; this adds items to the action bar if it is present.
        getMenuInflater().inflate(R.menu.main, menu);
        return true;
    }
    //Código generado por Android Studio
    @Override
    public boolean onOptionsItemSelected(MenuItem item) {
        // Handle action bar item clicks here. The action bar will
        // automatically handle clicks on the Home/Up button, so long
        // as you specify a parent activity in AndroidManifest.xml.
        switch (item.getItemId()) {
            case R.id.action_settings:
                return true;
        }
        return super.onOptionsItemSelected(item);
    }
    //Código generado por Android Studio
    /**
     * A placeholder fragment containing a simple view.
     */
    public static class PlaceholderFragment extends Fragment {

        public PlaceholderFragment() {
        }

        @Override
        public View onCreateView(LayoutInflater inflater, ViewGroup container,
                Bundle savedInstanceState) {
            View rootView = inflater.inflate(R.layout.fragment_main, container, false);
            return rootView;
        }
    }

    //Creando la factura por hard code
    private void createInvoiceObject(){
        invoiceObject.id=1234;
        invoiceObject.companyName="Movalink.com";
        invoiceObject.companyAddress="Calle Madrid, 1024. Cp. 30100";
        invoiceObject.companyCountry="España";
        invoiceObject.clientName="Telefónica";
        invoiceObject.clientAddress="Calle Asturias, 25, Cp. 40100";
        invoiceObject.clientTelephone="900 123 123";
        invoiceObject.date= "12/11/2013";
        invoiceObject.total=77.5;

        InvoiceDetails invoiceDetails1 = new InvoiceDetails();
        invoiceDetails1.itemCode="ART001";
        invoiceDetails1.itemName="Article 1 description";
        invoiceDetails1.quantity=2;
        invoiceDetails1.price=12.5;
        invoiceDetails1.total=25.0;

        InvoiceDetails invoiceDetails2 = new InvoiceDetails();
        invoiceDetails2.itemCode="ART002";
        invoiceDetails2.itemName="Article 2 description";
        invoiceDetails2.quantity=5;
        invoiceDetails2.price=10.5;
        invoiceDetails2.total=52.5;

        invoiceObject.invoiceDetailsList = new ArrayList<invoicedetails>();
        invoiceObject.invoiceDetailsList.add(invoiceDetails1);
        invoiceObject.invoiceDetailsList.add(invoiceDetails2);
    }
}
A continuación mostraremos el código de la clase utilizada para Generar, Mostrar y Enviar por e-mail el documento PDF, el código esta lo suficientemente comentado para que se puedan entender los procedimientos y la lógica de funcionamiento.
PdfManager.java
public class PdfManager {
    private static Context mContext;
    private static final String APP_FOLDER_NAME = "com.movalink.pdf";
    private static final String INVOICES = "Invoices";
    private static Font catFont;
    private static Font subFont ;
    private static Font smallBold ;
    private static Font smallFont ;
    private static Font italicFont ;
    private static Font italicFontBold ;

    //Declaramos nuestra fuente base que se encuentra en la carpeta "assets/fonts" folder
    //Usaremos arialuni.ttf que permite imprimir en nuestro PDF caracteres Unicode Cirílicos (Ruso, etc)
    private static BaseFont unicode;

    //!!!Importante: La carpeta "assets/fonts/arialuni.ttf" debe estar creada en nuestro projecto en
    //la subcarpeta "PdfCreator/build/exploded-bundles/ComAndroidSupportAppcompactV71900.aar"
    //En el caso de que Android Studio la eliminara la copiamos manualmente
    //PdfCreator/build/exploded-bundles/ComAndroidSupportAppcompactV71900.aarassets/fonts/arialuni.ttf
    private static File fontFile = new File("assets/fonts/arialuni.ttf");

    //Constructor set fonts and get context
    public PdfManager(Context context) throws IOException, DocumentException {
        mContext = context;
        //Creamos los distintos estilos para nuestro tipo de fuente.
        unicode = BaseFont.createFont(fontFile.getAbsolutePath(), BaseFont.IDENTITY_H, BaseFont.EMBEDDED);
        catFont = new Font(unicode, 22,Font.BOLD, BaseColor.BLACK);
        subFont = new Font(unicode, 16,Font.BOLD, BaseColor.BLACK);
        smallBold = new Font(unicode, 12,Font.BOLD, BaseColor.BLACK);
        smallFont = new Font(unicode, 12,Font.NORMAL, BaseColor.BLACK);
        italicFont = new Font(unicode, 12,Font.ITALIC, BaseColor.BLACK);
        italicFontBold = new Font(unicode, 12,Font.ITALIC|Font.BOLD, BaseColor.BLACK);
    }

    //Generando el documento PDF
    public void createPdfDocument(InvoiceObject invoiceObject) {
        try {

            //Creamos las carpetas en nuestro dispositivo, si existen las eliminamos.
            String fullFileName = createDirectoryAndFileName();

            if(fullFileName.length()>0){
                Document document = new Document();
                PdfWriter.getInstance(document, new FileOutputStream(fullFileName));

                document.open();

                //Creamos los metadatos del alchivo
                addMetaData(document);
                //Adicionamos el logo de la empresa
                addImage(document);
                //Creamos el título del documento
                addTitlePage(document, invoiceObject);
                //Creamos el contenido en form de tabla del documento
                addInvoiceContent(document,invoiceObject.invoiceDetailsList);
                //Creamos el total de la factura del documento
                addInvoiceTotal(document, invoiceObject);

                document.close();

                Toast.makeText(mContext, "PDF file created successfully", Toast.LENGTH_SHORT).show();
            }

        } catch (Exception e) {
            e.printStackTrace();
        }
    }

    private String createDirectoryAndFileName(){

        String FILENAME = "InvoiceSample.pdf";
        String fullFileName ="";
        //Obtenemos el directorio raiz "/sdcard"
        String extStorageDirectory = Environment.getExternalStorageDirectory().toString();
        File pdfDir = new File(extStorageDirectory + File.separator + APP_FOLDER_NAME);

        //Creamos la carpeta "com.movalink.pdf" y la subcarpeta "Invoice"
        try {
            if (!pdfDir.exists()) {
                pdfDir.mkdir();
            }
            File pdfSubDir = new File(pdfDir.getPath() + File.separator + INVOICES);

            if (!pdfSubDir.exists()) {
                pdfSubDir.mkdir();
            }

            fullFileName = Environment.getExternalStorageDirectory() + File.separator + APP_FOLDER_NAME + File.separator + INVOICES + File.separator + FILENAME;

            File outputFile = new File(fullFileName);

            if (outputFile.exists()) {
                outputFile.delete();
            }
        } catch (ActivityNotFoundException e) {
            Toast.makeText(mContext,e.getMessage(), Toast.LENGTH_SHORT).show();
        }
        return fullFileName;
    }

    //PDF library add file metadata function
    private static void addMetaData(Document document) {
        document.addTitle("movalink PDF");
        document.addSubject("Using iText");
        document.addKeywords("Java, PDF, iText");
        document.addAuthor("movalink.com");
        document.addCreator("movalink.com");
    }

    //Creando el Título y los datos de la Empresa y el Cliente
    private static void addTitlePage(Document document, InvoiceObject invoiceObject)
            throws DocumentException {

        Paragraph preface = new Paragraph();
        // Adicionamos una línea en blanco
        addEmptyLine(preface, 1);
        // Adicionamos el títulos de la Factura y el número
        preface.add(new Paragraph(mContext.getResources().getString(R.string.invoice_number) + invoiceObject.id, catFont));
        preface.add(new Paragraph(mContext.getResources().getString(R.string.invoice_date) + new Date(), italicFont));

        //Adicionamos los datos de la Empresa
        preface.add(new Paragraph(mContext.getResources().getString(R.string.company) + " " + invoiceObject.companyName,smallFont));
        preface.add(new Paragraph(invoiceObject.companyAddress ,smallFont));
        preface.add(new Paragraph(invoiceObject.companyCountry,smallFont));

        addEmptyLine(preface, 1);

        //Adicionamos los datos del Cliente
        preface.add(new Paragraph(mContext.getResources().getString(R.string.client_title), smallBold));

        preface.add(new Paragraph(mContext.getResources().getString(R.string.client_name) + " " + invoiceObject.clientName,smallFont));
        preface.add(new Paragraph(invoiceObject.clientTelephone,smallFont));
        preface.add(new Paragraph(invoiceObject.clientAddress ,smallFont));
        preface.add(new Paragraph(invoiceObject.clientCountry));

        addEmptyLine(preface, 1);

        //Adicionamos el párrafo creado al documento
        document.add(preface);

        // Si queremos crear una nueva página
        //document.newPage();
    }

    //Creamos el contenido de la factura, las líneas con los artículos.
    private static void addInvoiceContent(Document document, java.util.List<invoicedetails> invoiceDetail) throws DocumentException {

        Paragraph paragraph = new Paragraph();
        addEmptyLine(paragraph, 1);
        // Creamos una tabla con los títulos de las columnas
        createInvoiceTable(paragraph, invoiceDetail);
        // Adicionamos el párrafo al documento
        document.add(paragraph);

    }

    //Creamos el subtotal y el total de la factura.
    private static void addInvoiceTotal(Document document, InvoiceObject invoiceObject) throws DocumentException {

        Paragraph paragraph = new Paragraph();
        addEmptyLine(paragraph, 1);
        // Adicionamos la tabla al párrafo
        createTotalInvoiceTable(paragraph, invoiceObject);
        // Adicionamos el párrafo al documento
        document.add(paragraph);

    }

    //Procedimiento para crear los títulos de las columnas de la factura.
    private static void createInvoiceTable(Paragraph tableSection, java.util.List<invoicedetails> invoiceDetails)
            throws DocumentException {

        int TABLE_COLUMNS = 5;
        //Instaciamos el objeto Pdf Table y creamos una tabla con las columnas definidas en TABLE_COLUMNS
        PdfPTable table = new PdfPTable(TABLE_COLUMNS);// number of table columns

        //Definimos el ancho que corresponde a cada una de las 5 columnas
        float[] columnWidths = new float[]{80f, 200f, 50f, 80f, 100f};
        table.setWidths(columnWidths);

        //Definimos el ancho de nuestra tabla en %
        table.setWidthPercentage(100);

        // Aquí les dejos otras propiedades que pueden aplicar a la tabla
        // table.setBorderColor(BaseColor.GRAY);
        // table.setPadding(4);
        // table.setSpacing(4);
        // table.setBorderWidth(1);

        //Definimos los títulos para cada una de las 5 columnas
        PdfPCell cell = new PdfPCell(new Phrase(mContext.getResources().getString(R.string.detail_code),smallBold));
        cell.setHorizontalAlignment(Element.ALIGN_CENTER);
        //Adicionamos el título de la primera columna
        table.addCell(cell);

        cell = new PdfPCell(new Phrase(mContext.getResources().getString(R.string.detail_description),smallBold));
        cell.setHorizontalAlignment(Element.ALIGN_CENTER);
        //Adicionamos el título de la segunda columna
        table.addCell(cell);

        cell = new PdfPCell(new Phrase(mContext.getResources().getString(R.string.detail_amount),smallBold));
        cell.setHorizontalAlignment(Element.ALIGN_CENTER);
        //Adicionamos el título de la tercera columna
        table.addCell(cell);

        cell = new PdfPCell(new Phrase(mContext.getResources().getString(R.string.detail_price),smallBold));
        cell.setHorizontalAlignment(Element.ALIGN_CENTER);
        //Adicionamos el título de la cuarta columna
        table.addCell(cell);

        cell = new PdfPCell(new Phrase(mContext.getResources().getString(R.string.detail_total),smallBold));
        cell.setHorizontalAlignment(Element.ALIGN_CENTER);
        //Adicionamos el título de la quinta columna
        table.addCell(cell);

        //Creamos la fila de la tabla con las cabeceras
        table.setHeaderRows(1);

        //Creamos las lineas con los artículos de la factura;
        for (InvoiceDetails orderLine : invoiceDetails) {
            createInvoiceLine(orderLine, table);
        }

        tableSection.add(table);
    }


    //Procedimiento para crear una lines vacía
    private static void addEmptyLine(Paragraph paragraph, int number) {
        for (int i = 0; i < number; i++) {
            paragraph.add(new Paragraph(" "));
        }
    }
    //Procedimiento para adicionar una imagen al documento PDF
    private static void addImage(Document document) throws IOException, DocumentException {

        Bitmap bitMap = BitmapFactory.decodeResource(mContext.getResources(), R.drawable.ic_launcher);
        ByteArrayOutputStream stream = new ByteArrayOutputStream();
        bitMap.compress(Bitmap.CompressFormat.JPEG, 80, stream);
        byte[] bitMapData = stream.toByteArray();
        Image image = Image.getInstance(bitMapData);
        //Posicionamos la imagen el el documento
        image.setAbsolutePosition(400f, 650f);
        document.add(image);
    }


    //Procedimiento para crear las líneas de la factura en forma de tabla.
    private static void createInvoiceLine(InvoiceDetails invoiceLine, PdfPTable table) {
        PdfPCell cell = new PdfPCell();

        //Adicionamos celdas sin formato ni estilos, solo el valor
        table.addCell(invoiceLine.itemCode);
        table.addCell(invoiceLine.itemName);

        //Adicionamos celdas con formato y estilo: (font, align) para el correspondiente valor
        cell.setPhrase(new Phrase(String.valueOf(invoiceLine.quantity),smallFont));
        cell.setHorizontalAlignment(Element.ALIGN_RIGHT);
        table.addCell(cell);

        //Adicionamos celdas con formato y estilo: (font, align)
        cell.setPhrase(new Phrase(String.valueOf(invoiceLine.price), smallFont));
        cell.setHorizontalAlignment(Element.ALIGN_RIGHT);
        table.addCell(cell);

        //Adicionamos celdas con formato y estilo: (font, align)
        cell.setPhrase(new Phrase(String.valueOf(invoiceLine.total), smallFont));
        cell.setHorizontalAlignment(Element.ALIGN_RIGHT);
        table.addCell(cell);

    }


    //Procedimiento para crear los totales y subtotales de la factura en forma de tabla.
    //Misma lógica utilizada para crear los títulos de las columnas de la factura
    private static void createTotalInvoiceTable(Paragraph tableSection, InvoiceObject orderHeaderModel)
            throws DocumentException {

        int TABLE_COLUMNS = 2;
        PdfPTable table = new PdfPTable(TABLE_COLUMNS);

        float[] columnWidths = new float[]{200f, 200f};
        table.setWidths(columnWidths);

        table.setWidthPercentage(100);

        //Adicionamos el título de la celda
        PdfPCell cell = new PdfPCell(new Phrase(mContext.getResources().getString(R.string.invoice_subtotal),smallBold));
        cell.setHorizontalAlignment(Element.ALIGN_RIGHT);
        table.addCell(cell);

        double subTotal = orderHeaderModel.total;
        //Adicionamos el contenido de la celda con el valor subtotal
        cell = new PdfPCell(new Phrase(String.valueOf(subTotal)));
        cell.setHorizontalAlignment(Element.ALIGN_RIGHT);

        table.addCell(cell);

        //Adicionamos el título de la celda
        cell = new PdfPCell(new Phrase(mContext.getResources().getString(R.string.invoice_tax),smallBold));
        cell.setHorizontalAlignment(Element.ALIGN_RIGHT);
        table.addCell(cell);

        //Adicionamos el contenido de la celda con el valor tax
        cell = new PdfPCell(new Phrase(String.valueOf(0)));
        cell.setHorizontalAlignment(Element.ALIGN_RIGHT);
        table.addCell(cell);

        //Adicionamos el título de la celda
        cell = new PdfPCell(new Phrase(mContext.getResources().getString(R.string.detail_total),smallBold));
        cell.setHorizontalAlignment(Element.ALIGN_RIGHT);
        table.addCell(cell);

        //Adicionamos el contenido de la celda con el valor total
        cell = new PdfPCell(new Phrase(String.valueOf(orderHeaderModel.total)));
        cell.setHorizontalAlignment(Element.ALIGN_RIGHT);
        table.addCell(cell);

        tableSection.add(table);

    }

    //Procedimiento para mostrar el documento PDF generado
    public void showPdfFile(String fileName, Context context){
        Toast.makeText(context, "Leyendo documento", Toast.LENGTH_LONG).show();

        String sdCardRoot = Environment.getExternalStorageDirectory().getPath();
        String path = sdCardRoot + File.separator + APP_FOLDER_NAME + File.separator + fileName;

        File file = new File(path);

        Intent intent = new Intent(Intent.ACTION_VIEW);
        intent.setDataAndType(Uri.fromFile(file),"application/pdf");
        intent.setFlags(Intent.FLAG_ACTIVITY_CLEAR_TOP);
        intent.setFlags(Intent.FLAG_ACTIVITY_NEW_TASK);
        try {
            context.startActivity(intent);
        }
        catch (ActivityNotFoundException e) {
            Toast.makeText(context, "No Application Available to View PDF", Toast.LENGTH_SHORT).show();
        }
    }

    //Procedimiento para enviar por email el documento PDF generado
    public void sendPdfByEmail(String fileName, String emailTo, String emailCC, Context context){

        Intent emailIntent = new Intent(Intent.ACTION_SEND);
        emailIntent.putExtra(Intent.EXTRA_SUBJECT, "Movalink PDF Tutorial email");
        emailIntent.putExtra(Intent.EXTRA_TEXT, "Working with PDF files in Android");
        emailIntent.putExtra(Intent.EXTRA_EMAIL, new String[]{emailTo});
        emailIntent.putExtra(Intent.EXTRA_BCC, new String[]{emailCC});

        String sdCardRoot = Environment.getExternalStorageDirectory().getPath();
        String fullFileName = sdCardRoot + File.separator + APP_FOLDER_NAME + File.separator + fileName;

        Uri uri = Uri.fromFile(new File(fullFileName));
        emailIntent.putExtra(Intent.EXTRA_STREAM, uri);
        emailIntent.setType("application/pdf");

        context.startActivity(Intent.createChooser(emailIntent, "Send email using:"));
    }

}
El resultado de nuestro documento PDF es el siguiente:

Enviamos por e-mail el documento PDF, utilizando Intent.ACTION_SEND

No olvidar hacer los cambios pertinentes en el AndoridManifest.xml, para permitir la lectura y escritura en nuestro dispositivo.
Puede descargar el código fuente en: PDFCreatorSource
No hay comentarios:
Publicar un comentario